To start off, I'll begin by saying that there is a distinct difference between the way you make brushes in Painter and the way you make them in Photoshop. Though they share similar tendencies, when you make a brush in Painter you will always be basing it off a brush that already exists, rather than just making a brush out of an image and then applying the settings you want. Though this may seem like a hindrance, in the end it will give you more versatility because you can select from a number of different types of brushes to base your custom ones off of, which ultimately allows you some extra variety.
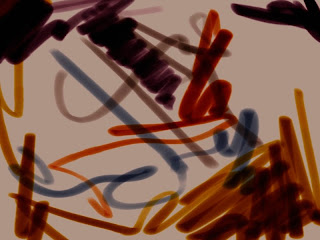
So, let's get to it! To make a custom brush, the first thing you want to do is find a brush with some qualities that you already like so you can start off in the right direction. I'm going to make an all-purpose painting brush, and I'm going to start with the Fine Point Marker 5 from the Felt Pens category. I chose this one because it is a slightly squashed shape which is more interesting than just a round brush, but what I particularly like about it is the way it blends color with the paint that's already on the canvas. The problem with it is that it only darkens what is beneath it, much like a real felt pen, but I want to make a paintbrush out of it that I can paint lights and darks with. Here's an example of what it looks like by default:

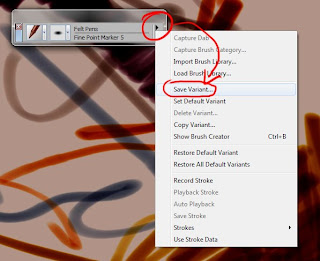
To get started, you'll want to make a copy of this brush so the original is still intact if you ever want it. Click the arrow at the top right of your brush selector and click Save Variant, then type in a name for your brush and click ok, it should show up in that brush category automatically


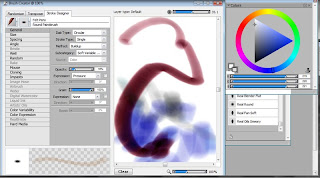
Variant is essentially another word for Brush in Painter, so you now have a base to build your brush off of. Now it's time to start editing, open your brush editor either by pressing Ctrl (Command) + B or by going to Window -> Show Brush Creator. The brush creator should open, don't worry if Painter seems to minimize, it's just some wonky interface code, which is most peoples' complaint with Painter. Save often and it won't be a problem. So, the brush creator, it probably looks really overwhelming and there are too many options to cover here; I'll go over some of the major ones, but my advice to you is experiment! Try making 10 custom brushes that look different and learn what the different settings do, with a little patience you'll become very comfortable in the brush editor. On the left is all your brush settings, and on the right is a little window for you to test your brush in.

A quick explanation of the options in the left image, as they'll be a good place to start:
Dab Type: This is the shape of the brush tip. It is the "stamp" that the program repeats to make a stroke.
Stroke Type: This is how painter interprets the stamp, if it just puts one in front of the other, puts multiple ones next to each other, etc. This one is less important, but play with it to see if you can get something interesting.
Method: This is the big one! This is how the brush actually behaves, the way in which it lays down paint. You can see in the image above that this marker is set to Buildup, which means that it is building color on top of existing color which is why this brush can only darken. Play with the different methods to get the brush you want; I'm going to change mine to Cover because I simply want it to put down paint, covering the existing paint.
Subcategory: These are individual distinctions within each Method, you can use them to further customize the way your brush behaves. In mine, the Method is Cover and the subcategories are Flat Cover, Soft Cover, and various Grainy Covers. Flat is going to just be a plain brush, soft is going to have softer edges, and grainy is going to apply paper textures. Grainy is a powerful cover method, this is what you'll use if you want your brush to take advantage of the paper textures in the previous two segments! I want this particular brush to be simpler so I'm going to leave it on Flat Cover, but I have several brushes with grainy cover that are specifically for applying texture.
Source: This is what the brush paints. Don't worry about this, it only applies to certain brushes and you'll never really use it unless you want to stamp an image file. Again, experimenting is your best bet.
Next up I'm going to skip to the Well tab in my brush creator. This has to do with the consistency of the paint going down and how it reacts to other paint. Again, there are too many options to cover, so just play around with them and figure out what they do. Make a stroke in the brush tester, change the setting, make another stroke and see what's different about them. Now, the Well tab is interesting because most of its settings appear at the top of Painter even when you're not in the brush creator, allowing you to adjust these settings while working, which is very handy.
A quick overview of Well's settings:
Resaturation: Is how much new paint the brush will apply to the canvas. If the resaturation is high, it is like a brush dipped deeply in to a big blob of paint, it will totally cover anything already on the canvas. If the resaturation is low, it's like just picking up a few bits of paint on the end of your bristles, and it's going to mingle with the paint already on the canvas.
Expression: This appears under a lot of options in the brush creator. This is an important one, it is an option that allows you to vary that particular setting based on the input of your pen (assuming you have a tablet that can read those particular settings). If you change Resaturation's expression to Pressure then the resaturation will be higher the more pressure you apply. If you click the checkbox to the left of the expression, you will reverse the expression, so checking the box when set to pressure would make the resaturation higher the less pressure you apply. If that's confusing, again, experiment.
Bleed: This is how the color will bleed and blend with paint already on the canvas, and it ties in with resaturation. If you have a low resaturation and are not putting on new paint, then how does it react with the paint that's already there? Increasing the bleed will make the paint blend together more, both color and value. In my opinion this is Painter's most powerful feature, how it blends color, increasing the bleed is going to give you very lively transitions between colors, which is good if you're blending with it. I want this brush to be pretty blendy, so I'll increase the bleed and decrease the resaturation, it now behaves very much like wet in to wet oil paint.
Dryout: This is how fast the brush runs out of paint. If you use the Artists' Oils, you'll notice that you make a stroke and it fades out as you keep dragging it. If you decrease the dryout, the brush will run out of paint faster and will fade off. This can be nice if you only want to make short strokes with this brush.
And that's going to be all I edit for this brush, all that's left is to close the brush creator and play around with it! Changing the Method to Cover, reducing the Resaturation and increasing the Bleed has turned a marker in to a nice, blendy paintbrush that you could use to paint an entire piece:
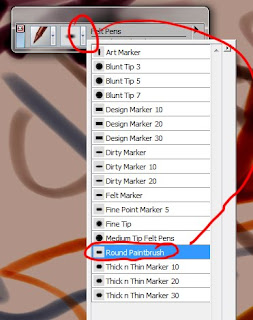
Now to finish it off, click the arrow in the brush selector where you saved the variant, and this time click Set Default Variant. This will make the current settings the brushes default settings, and if you click that same arrow and click Restore Default Variant it will return the brush to those settings. This is handy if you accidentally edit a default brush, you can then save a variant with the edited version, and restore the default brush to its default settings. Obviously, you can click Delete Variant to get rid of a brush you don't want any more.
And that's it for this segment! The next part will get more in-depth and show you some features where you can create really customized brushes outside of Painter's default options. But for now, play around with this and experiment until you're comfortable in the brush creator!


No comments:
Post a Comment