
As stated in Part One, dabs are the shape of the brush that Painter repeats in succession to create a brush stroke, the same way Photoshop does. This is useful because you can essentially use any image you want to create a dab with, and therefore make any brush shape you want. This coupled with the settings in the brush creator gives you a ton of possibility in the variety of brushes you can make.
It's relatively simple to do, the first thing you'll need is a black and white image with the kind of stroke you want the brush to have. This image will function similarly to paper textures; black will paint at the full opacity of your brush, midtones will paint a moderate opacity, and white will be totally transparent. Also remember that to make a brush stroke Painter will layer this image one in front of the other, so bear in mind that there will be some overlap and not all the texture will show through.
To demonstrate, I'll make a fairly realistic paintbrush stroke. The previous part showed the creation of a nice paint-like brush that blends like wet in to wet oil, but the stroke is just an oval, I think it would be nice if the stroke were more interesting so I'm going to edit that one. You could make an entirely new brush if you wanted to; but note that some kinds of brushes (Arists' Oils for instance) have special settings and behaviors and therefore cannot use captured dabs. As always, it will just take some experimenting to find what brushes will work and what won't.
Now, here's the image I'm going to use for my captured dab:
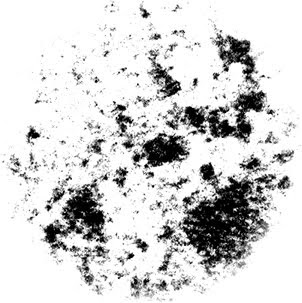
This is going to make a nice dab because it has some texture that will show up if I just tap the brush, and there's some texture near the edges that will create the ragged look of a real brush. Your image should be relatively high contrast and probably shouldn't be larger than 500x500 pixels.
Open up your image in painter, then press Ctrl (Command) + A to select all, or go to Select -> All. A dotted line should appear around the whole image, showing that it is selected. Now go up to the arrow at the top right of your brush selector where you save variants, and this time click Capture Dab.
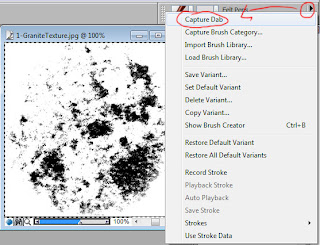
This image should now be in place as your captured dab. Open up your brush creator with Ctrl (Command) + B or Window -> Show Brush Creator and under the General tab set your Dab Type to Captured (It may be set there automatically). After that, make some strokes in the brush testing area to see your dab in action!
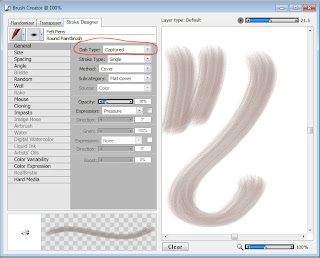
You'll probably want to adjust some of your settings to take advantage of this more complex stroke to get it looking even more dynamic. I like the way my dab is looking, but I want it to react more to the stroke of the pen like a real brush would. I'm not going to go in-depth about the settings I change because most of that is covered in part one; but the basics of what I changed was that I made the angle change based on direction, reduced the spacing between each stamp of the dab to make it smoother, and changed its method subcategory to a grainy one so it will use my selected paper textures. As said in part one, just experiment with the different settings to get the kind of brush you're looking for, this whole thing is about creating your own unique brushes, so don't be formulaic! Look for happy accidents!
Here's a comparison of the brush before and after using a captured dab and the adjusted settings:

And that's it for this section! This is a powerful part of making brushes in Painter, and it's going to be one of the most useful ones if you want to get natural looking brush strokes. Painter's default brushes are great on the color mixing side, but their bristles are just a lot of little dots placed close together which doesn't look very natural and gets laggy if you make the brush big. Captured dabs are more interesting, more varied, and less laggy.
I hope you found this useful, and enjoy your brushmaking! Tomorrow I'll cover using Painter's Impasto feature and how to layer different brushes to create very traditional looking brush strokes.
No comments:
Post a Comment